Cheesy Garlic Chicken Wraps That Are Crispy Outside, Gooey Inside, and Done in 25 Minutes
There’s a particular kind of recipe that looks effortless from the outside and quietly punishes you for treating it that way. Chicken wraps sit squarely in that category.
Fold something into a tortilla, put it in a pan, and technically you’ve made dinner.
But if you didn’t build the interior correctly, the cheese separates into a greasy pocket, the filling slides to one end, and the outside goes soft before you even get it to the table.
The wrap itself is fine. What’s inside it is a mess.
I’ve cooked a lot of wraps.
Not because they were glamorous, they were never glamorous, but because they work, when you understand what’s actually happening inside them.
And the version I keep landing on uses fresh garlic in two places, a specific layering order for the cheese, and a compound butter on the outside that does something to the shell that plain oil simply can’t replicate.
It’s not complicated. It just requires attention to the right things.
If garlic and chicken together is a combination you keep coming back to, the creamy garlic chicken on this site uses the same flavor logic – bold, present garlic without anything muddying it.
The Part Most Recipes Get Wrong

The filling in a cheesy garlic chicken wrap is not a casserole.
You’re not looking for everything to melt together into one uniform mass.
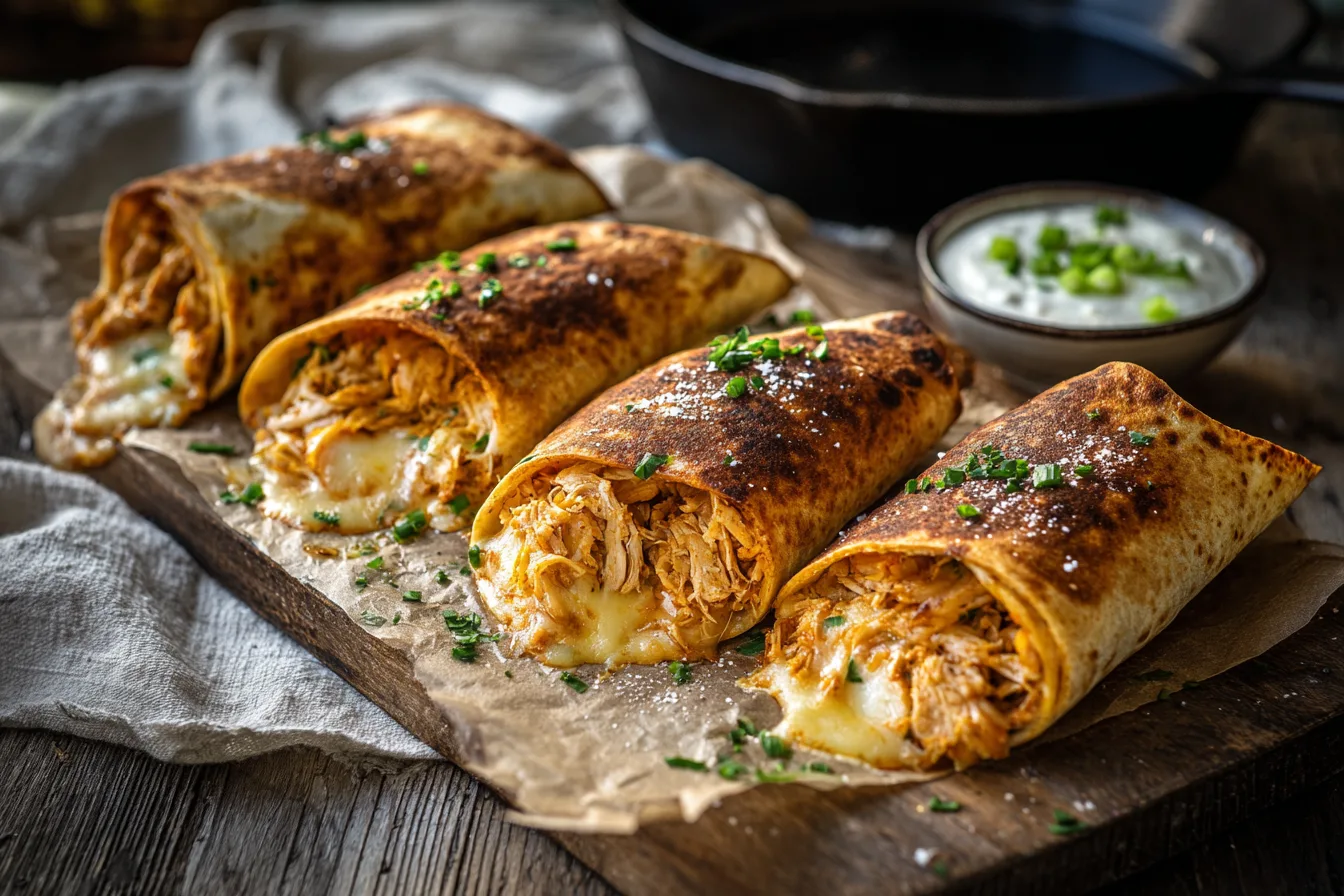
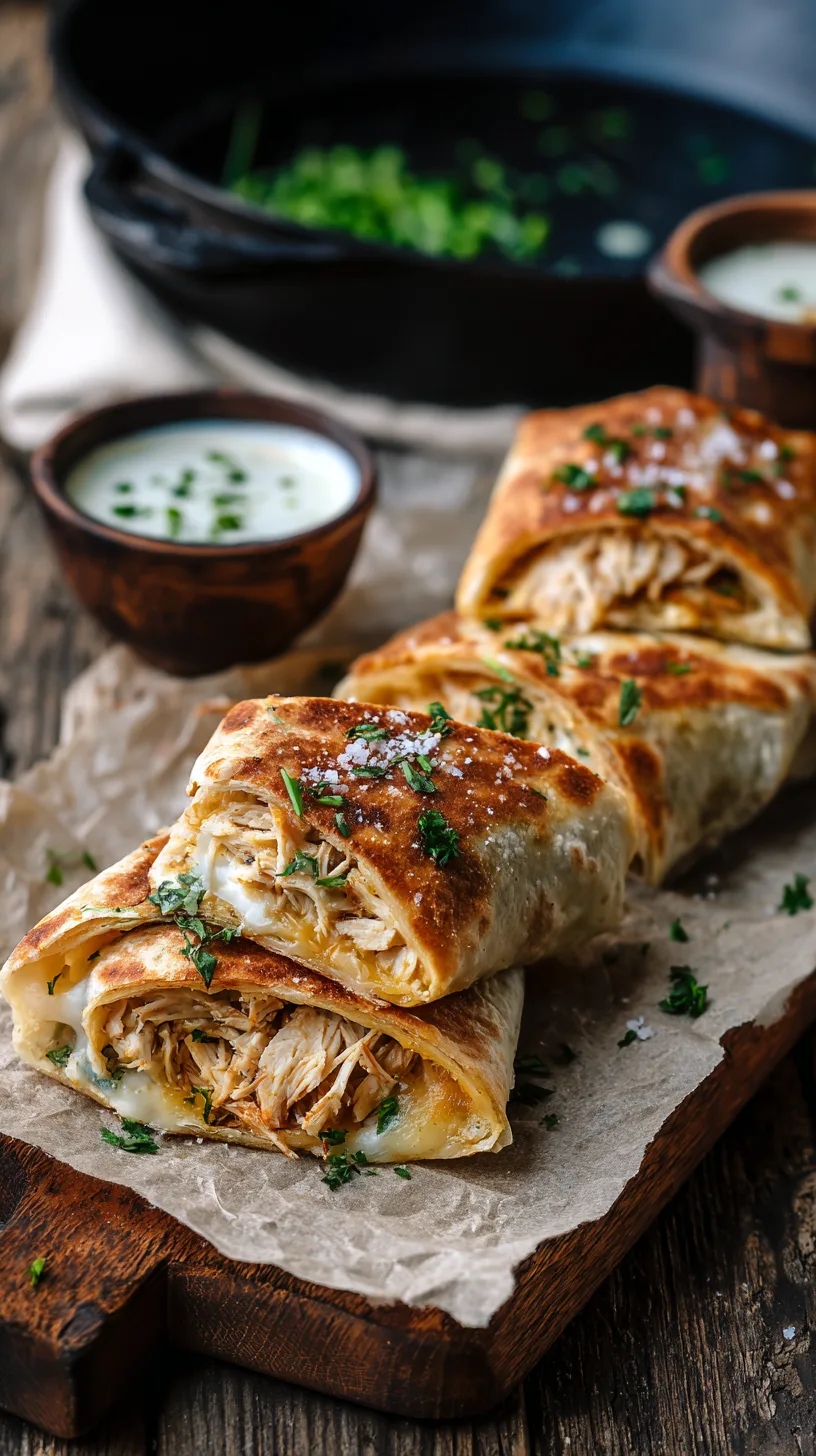
What you want is distinct layers that hold their structure through the rolling and the heat – so when you cut into it, each component is still present and identifiable.
The mistake is mixing all the cheese directly into the chicken and calling that the filling.
When you do that, the cheese has nowhere to go during cooking except outward – through the seams, down into the pan, gone.
Instead, lay two tablespoons of mozzarella directly on the tortilla first. That becomes the base layer, and when it melts against the tortilla’s inner surface it creates a seal.
Then add the chicken mixture.
Then more cheese on top of the filling.
Now the interior has structure – a bottom seal, a protein layer, and a molten top that holds the whole thing together when you slice it.
Roll it tight from the bottom, fold the sides in first, and place it seam-side down immediately.
It should feel firm and compact in your hand.
If it feels loose, it’s going to open in the pan and the whole sequence falls apart.
Understanding how cheese behaves under heat is the same principle behind a properly built loaded queso dip – control the melt, and you control the texture of everything around it.
What the Garlic Is Actually Doing
Fresh garlic, grated fine on a microplane rather than minced, distributes differently in a filling than chopped garlic does.
Minced garlic gives you pockets – bites that are sharp and then gone. Grated garlic dissolves into the sauce and spreads evenly, so the garlic flavor registers in every part of the filling rather than in occasional flashes.
Three cloves is the right amount for two cups of chicken. It’s assertive without overtaking the cheese.
The binder matters too.
Mayonnaise alone makes the filling heavy and one-dimensional.
Greek yogurt alone makes it too lean and slightly sour when the heat hits it. To
ether – two tablespoons of each – they balance cleanly.
The mayo carries the fat and coats the chicken, and the yogurt cuts through it with a mild tang that keeps the filling from reading as rich.
A teaspoon of hot sauce isn’t for heat. It’s for brightness. It sharpens the whole mixture and keeps the garlic from going flat.
Smoked paprika does more work in this filling than most people give it credit for – if you want to understand how spices actually function in a dish rather than just flavoring it, this breakdown of culinary spices is worth reading before you season anything.
Why the Compound Butter Changes Everything
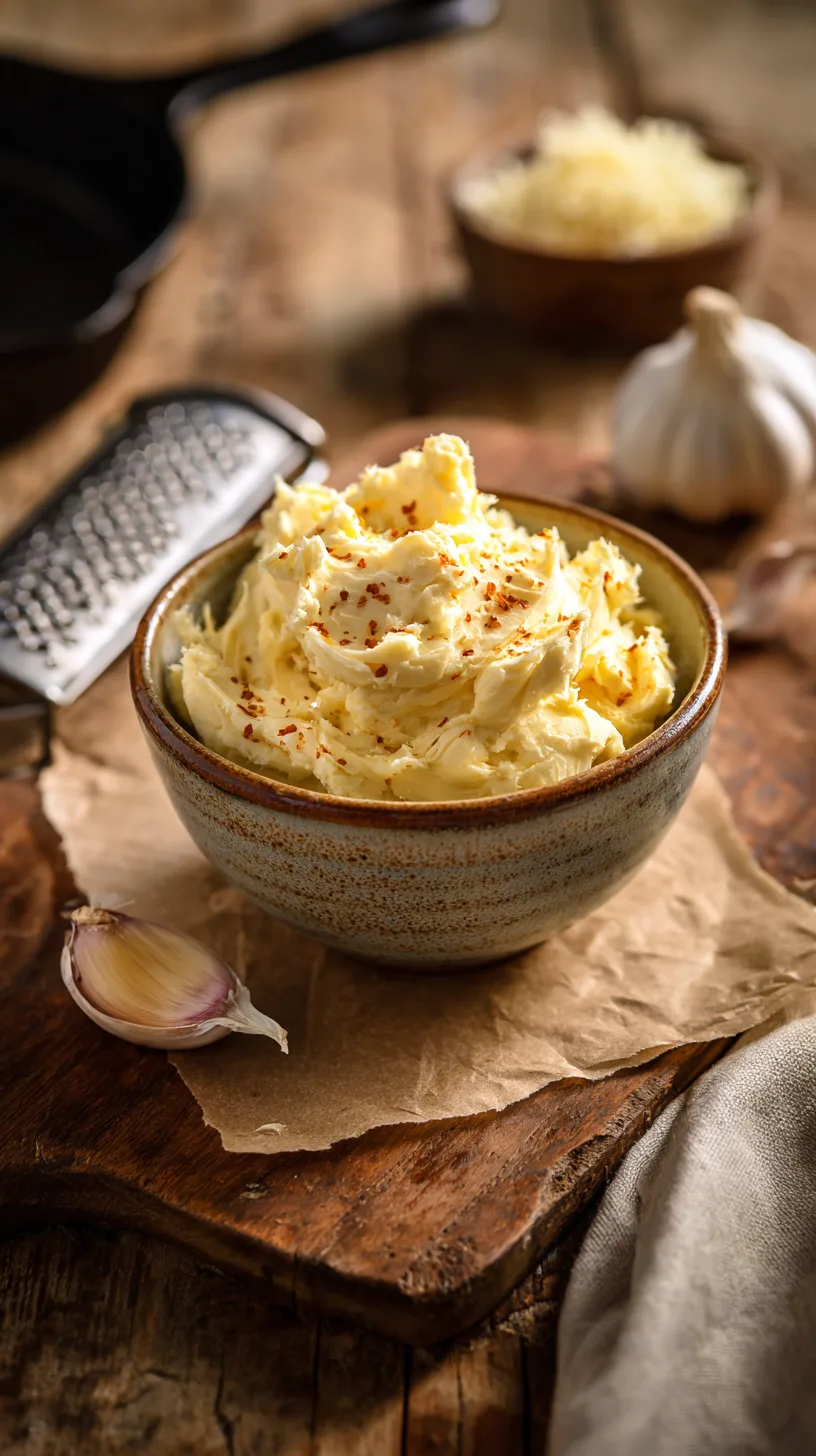
This is the part that separates this recipe from every other version out there, and it’s simpler than it sounds.
Softened butter, one more clove of grated garlic, smoked paprika, a pinch of flaky salt – mashed together and spread thin across the outside of each wrap before it hits the pan.
Here’s what happens.
Oil conducts heat evenly but doesn’t carry flavor to the surface.
Butter does.
The garlic in the compound butter makes direct contact with the hot pan surface and caramelizes against it – not burns, caramelizes – which gives the outside of the shell a toasted, slightly sweet garlic depth that’s completely different from the raw garlic inside.
The smoked paprika colors the crust a deep amber and adds a low, woody undertone that plays against the sharp interior.
The two garlic elements – raw and grated inside, toasted and caramelized outside – taste like the same ingredient doing two different jobs in the same bite.
The shell also crisps faster with butter than with oil because butter’s milk solids begin browning at a lower temperature.
You get more surface color before the interior overcooks.
And the flaky salt on the outside of the shell does what it always does: it concentrates at the surface and creates a clean savory hit the moment it touches your mouth, before the filling even registers.
Garlic butter against a hot cast iron surface does something that plain oil never will – if you want to see that same principle applied to a different cut of protein, the garlic butter steak bites on this site use the same technique with the same logic behind it.
The Pan, the Heat, and the Lid
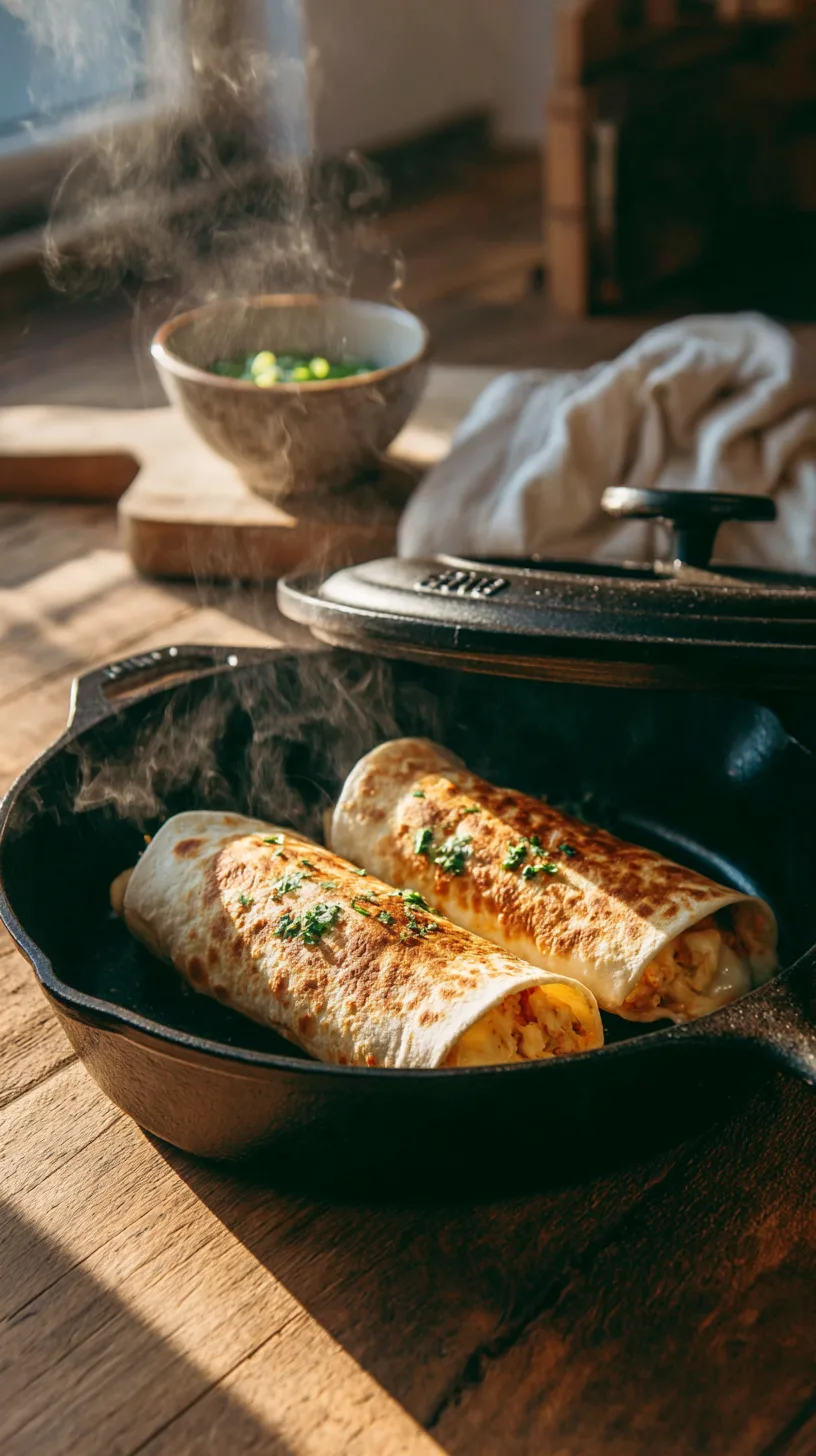
Use a wide non-stick pan or a well-seasoned cast iron.
Medium-high heat.
Let it come up to temperature before anything goes in – a wrap placed on a cold or lukewarm pan won’t get the surface contact it needs and the shell will steam instead of sear.
Place the wraps seam-side down.
Put the lid on for the first two minutes.
This is the step that most recipes leave out, and it’s the one that actually solves the problem people complain about – the outside burning before the inside heats through.
The trapped steam melts the cheese from the inside while the shell starts building color from the outside.
After two minutes, pull the lid off. Let the remaining two minutes finish dry so the shell loses any residual moisture and crisps up completely.
Flip carefully with a wide spatula, press lightly to make contact, and give it another three minutes on the second side without the lid.
When it’s done, the shell should feel dry and firm when you press it.
Not soft.
Not yielding.
There should be an audible crackle when you pick it up. That’s the target.
Let it rest sixty seconds before slicing – the cheese inside needs that window to settle from fully molten to just cohesive enough to hold the cut.
Getting the most out of a hot pan is a skill that carries across almost everything you cook – the full breakdown of the sauté cooking method covers surface contact, heat retention, and why the pan temperature at the moment food hits it matters more than most recipes acknowledge.
Scaling This Without Losing Your Mind
For two people, this is a 25-minute dinner.
For six or eight, the filling scales without issue – double the batch, keep it cold in the fridge, and assemble and cook in shifts.
The compound butter is also easy to scale and keeps in the fridge for a week, which means if you make it once you’ve got it ready for the next round.
What changes at volume is the pan temperature.
Every wrap you add drops the surface heat slightly.
Cook in batches of two rather than crowding the pan.
A crowded pan means steam builds between the wraps, the shells go soft, and you lose everything the compound butter was supposed to do.
Two at a time.
Let the pan recover heat between batches for about 90 seconds.
Doubling a recipe sounds straightforward until you’re standing at a stove that can’t keep up – the guide on how to double a recipe covers the specific places where scaling breaks down and what to adjust before it does.
What It Gives You Nutritionally
Each wrap comes in around 680 calories with 46 grams of protein.
That’s a meal, not a snack.
The protein comes almost entirely from the chicken and the cheese, the fat from the cheese and the compound butter.
There’s no pretending this is light – the butter is doing real work on the outside of the shell, and the two-cheese interior is exactly as indulgent as it sounds.
If you want to reduce the fat load, cut the mozzarella by a third and use the yogurt-forward binder.
The structure holds. The flavor drops slightly but stays solid.
Swaps That Work and Ones That Don’t
Pepper jack in place of mozzarella gives you stretch and heat, which works well if you’re serving people who want the spice.
Smoked provolone gives you a deeper, more savory melt with less pull.
Pre-shredded bags from the grocery store have an anti-caking coating that prevents clean melting – buy the block and shred it yourself.
Whole wheat tortillas work structurally but roll stiffer and slightly crack at the seam.
Warm them in a dry pan for 20 seconds on each side before assembling and the flexibility comes back.
Low-carb tortillas behave well in the pan but have a specific texture that reads more like a crepe than a flour tortilla – not wrong, just different.
For the chicken, rotisserie is the path of least resistance.
If you’re cooking from raw, slice the breast thin, season with salt, pepper, and a light dusting of garlic powder, and cook in a dry cast iron until just cooked through.
Shred while still warm.
Cold leftover chicken that’s been sitting in the fridge tends to be dry, so add a small spoon of chicken broth to the filling to bring the moisture back.
If you’re making the garlic aioli from scratch rather than reaching for a jar – which is worth the three minutes it takes – the homemade mayonnaise recipe here gives you a cleaner, sharper base than anything store-bought and takes the dipping sauce from an afterthought to something that holds its own alongside the wrap.
Recipe For Cheesy Garlic Chicken Wraps
Print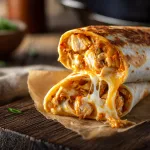
Cheesy Garlic Chicken Wraps
- Prep Time: 10 minutes
- Cook Time: 15 minutes
- Total Time: 25 minutes
- Yield: 4 wraps 1x
- Category: Dinner, Lunch
- Method: Stovetop
- Cuisine: American
Description
hese cheesy garlic chicken wraps are the kind of meal you keep coming back to on a busy night. Shredded chicken gets mixed with fresh garlic, a creamy tangy sauce, and two cheeses – then rolled tight and pan-fried until the shell cracks and the inside stays molten. The whole thing comes together in about 25 minutes, and the filling holds the entire time. No broken sauce, no soggy tortilla, no guesswork.
EQUIPMENT
Large non-stick skillet or cast iron pan Small mixing bowl Cheese grater Microplane or fine grater (for garlic) Silicone spatula Lid that fits your skillet Sharp knife and cutting board
Ingredients
For the Chicken Filling
- 2 cups cooked chicken, shredded or chopped into small bite-sized pieces (rotisserie chicken works perfectly here)
- 3 cloves fresh garlic, finely grated on a microplane
- 2 tablespoons light mayonnaise
- 2 tablespoons plain Greek yogurt
- 1 teaspoon hot sauce (Frank’s RedHot or your preferred brand)
- 1/2 teaspoon smoked paprika 1/2 teaspoon Italian seasoning
- 1/4 teaspoon salt, plus more to taste
- 1/4 teaspoon black pepper
- 3 green onions, thinly sliced
For the Cheese Layer
- 1 cup shredded mozzarella, divided
- 1/2 cup shredded sharp cheddar, divided
For the Garlic Compound Butter (the original element — see notes)
- 2 tablespoons unsalted butter, softened to room temperature
- 1 clove fresh garlic, finely grated
- 1/4 teaspoon smoked paprika Pinch of flaky salt
For Assembly
- 4 large flour tortillas, burrito-sized (10–12 inch)
- Olive oil spray or a thin film of neutral oil for the pan
Optional Garnish and Serving
- Fresh flat-leaf parsley, roughly chopped
- Parmesan, a light dusting Flaky salt
- Red pepper flakes
- Garlic aioli
- Ranch dressing, or marinara for dipping
Instructions
- Make the Garlic Compound – Butter In a small bowl, mash together the softened butter, grated garlic, smoked paprika, and a pinch of flaky salt until smooth and combined. Set it aside at room temperature. You’ll use this right before the wraps go into the pan.
- Build the Filling – In a larger bowl, combine the shredded chicken, grated garlic, mayonnaise, Greek yogurt, hot sauce, smoked paprika, Italian seasoning, salt, and pepper. Stir everything together until the chicken is evenly coated and the sauce clings rather than pools. Taste it here and adjust the salt or hot sauce if it needs it. Fold in the sliced green onion last.
- Layer the Cheese, Then the Filling Lay a tortilla flat on your work surface. Scatter about 2 tablespoons of mozzarella along the lower third of the tortilla — this cheese layer is what seals the bottom and keeps the filling anchored. Spoon roughly half a cup of the chicken mixture directly on top of that cheese. Add another tablespoon of mozzarella and a light pinch of cheddar on top of the filling. Finish with a few more slices of green onion if you like.
- Roll It Tight Fold in both sides of the tortilla toward the center, about an inch on each side. Then roll from the bottom up, keeping it firm and snug the whole way. Place it seam-side down and press it lightly with your hand so it holds. Repeat with the remaining three wraps.
- Butter the Outside Using a small spoon or your fingers, spread a thin layer of the garlic compound butter across the outside of each wrap — both sides. You don’t need much. Just enough to coat the surface.
- Pan-Fry Until Golden Heat a large non-stick skillet over medium-high heat. Lightly spray with olive oil or add a thin film of neutral oil. Once the pan is hot, place the wraps seam-side down. Don’t touch them for 3 to 4 minutes. Place the lid on the pan for the first 2 minutes — the trapped heat melts the cheese inside while the shell starts to crisp. Remove the lid, then carefully flip each wrap and cook the other side for another 3 minutes until golden and the shell has a dry, even crackle to it.
- Slice and Serve Transfer the wraps to a cutting board and let them rest for about 60 seconds before slicing. Cut each one on a diagonal. The cheese should hold inside the cut, not pour out. Dust with a little Parmesan, parsley, and red pepper flakes if using, and serve hot with your dipping sauce of choice.
Notes
Every other recipe in this space uses garlic one way: either fresh garlic mixed into the filling, or a garlic butter swirled in the pan. This recipe does both. Fresh grated garlic goes into the filling and gives you a sharp, present hit from the inside. Then a separate garlic compound butter – made with softened butter, grated garlic, smoked paprika, and a pinch of flaky salt – gets spread across the outside of the wrap before it hits the pan.
Nutrition
- Serving Size: 1 Serving
- Calories: 682 kcal
- Sugar: 3g
- Sodium: 890mg
- Fat: 34g
- Saturated Fat: 14g
- Unsaturated Fat: 16g
- Trans Fat: 0g
- Carbohydrates: 48g
- Fiber: 2g
- Protein: 46g
- Cholesterol: 118mg
Chicken storage is one of those things that matters more than most home cooks realize – the full guide on storing raw and cooked chicken covers exactly how long each form keeps, how to refrigerate it correctly, and what to look for before it goes into a filling.
FAQs
The filling keeps in the fridge for three days. Assemble and cook them fresh – assembled uncooked wraps sitting in the fridge get soggy.
Yes. Brush with oil instead of the compound butter – butter can smoke at high air fryer temps. 375°F for 7 minutes, flip once halfway.
You’re not rolling tight enough, or you’re moving them too soon. Seam-side down, don’t touch them for the first three minutes.
The cooked wraps freeze acceptably. Reheat in a dry skillet from frozen on low heat with the lid on for the first five minutes. They won’t be identical to fresh but they’re close enough.
Sour cream is looser and higher in fat. It makes the filling slightly wet, and at pan temperature it can separate. Greek yogurt is thicker, drier, and more stable under heat.
Press the center of the wrap lightly with your spatula. If the filling has softened and moves under the pressure, the inside is hot. If it still feels firm and dense, give it another minute with the lid on.
Garlic aioli made from mayo, one small grated garlic clove, lemon juice, and salt. Takes three minutes. The jarred version works but the fresh one tastes like a different condiment entirely.
If this kind of cooking makes sense to you – practical, technique-driven, nothing wasted – the Nashville hot chicken sliders follow the same instinct: a handheld built around what the protein actually needs, not around what photographs well.
The Final Bite
A wrap this straightforward has no business tasting this good.
That’s the point.
Two kinds of garlic, a compound butter that does the work you didn’t know needed doing, and a cheese layer that holds from the first cut to the last bite.
Twenty-five minutes, one pan, nothing wasted.
If this is the kind of cooking that makes sense to you – practical, grounded, built on technique rather than trends – I put that same thinking into every issue of the Simply Delicious Digest.
I brings twenty plus years of commercial kitchen and high level restaurant experience to recipes that work the first time and hold up every time after that. Worth a spot in your inbox.
Now go make the wraps.
About the Author
Ryan Yates is a culinary expert with over 20 years of experience in commercial kitchens. As a working executive chef, he has a passion for creating delicious, accessible recipes that bring joy to home cooks everywhere. Ryan believes in the magic of simple ingredients and loves sharing his knowledge to help others find happiness in cooking.