How to Make Caramel Candy Apples That Actually Stick
The first caramel apple I ever had wasn’t at some fancy dessert station. It was the Santa Cruz County Fair. Early September, buses hauling us down from Valencia Elementary, that dusty sweet smell of hay and cotton candy hitting the nose before we even stepped off. We’d wander past the barns, watch the little magic shows, and then… those apples. Lined up in neat rows, bright green fruit trapped under glossy caramel.
I remember biting into one. The caramel tugged at my teeth like it wasn’t ready to let go, the apple snapped back with sour juice. Sticky fingers, sugar glued to my cheek, no napkins in sight. That was fall for me. And here’s the funny part: twenty-plus years of cooking in professional kitchens later, sauces, candies, you name it, those same apples are still a trick. You think they’re easy, and then the caramel slides off, or it sets like glass, or worse, turns grainy like wet sand.
That’s the hook. Looks simple. Isn’t. But once you know the little moves, the tricks that line cooks and pastry folks whisper when the sugar hits the edge, it clicks.
If fall baking feels nostalgic for you too, you might love these pumpkin chocolate chip muffins – they carry that same cozy back-to-school vibe in every bite.
The Apples, the Sugar, the Fat

Apples are your foundation. Tart varieties like Granny Smith or Honeycrisp carry enough bite to cut through the sugar. If you’re shopping farmers’ markets in Watsonville or up along Highway 1, you’ll find bins of these around September. The fresher the apple, the more the flavor balance works. Supermarket fruit often has a wax coating. That’s your enemy – caramel won’t cling to wax. A hot water dip with a splash of cider vinegar solves that.
Butter is non-negotiable. I use unsalted butter, high-fat European style if I can get it, because the caramel turns creamier and richer. That depth matters when you’re biting into something as simple as sugar and apple.
Brown sugar brings molasses notes and helps caramelize evenly. Light brown sugar gives you a golden finish. Dark brown tilts more toward bitter-toffee flavors. I usually stick to light for apples, since the fruit is already tart.
Corn syrup gets a bad rap, but here it’s functional. It stops the sugar from crystallizing. Without it, you risk grainy caramel. Think of it as insurance.
Sweetened condensed milk or heavy cream gives the caramel body and chew. Condensed milk brings extra sweetness and a fudgier consistency. Cream keeps it looser and silkier. Both work, but they change the final texture.
Vanilla and salt are the finishers. Vanilla rounds the sweetness while salt cuts it. I’ll often use a flake salt sprinkled at the end for a little bite.
When learning the basics of caramel, it helps to understand the difference between common sugars – this guide on what is demerara sugar breaks it down simply and shows when to use it.
Sugar on the Edge
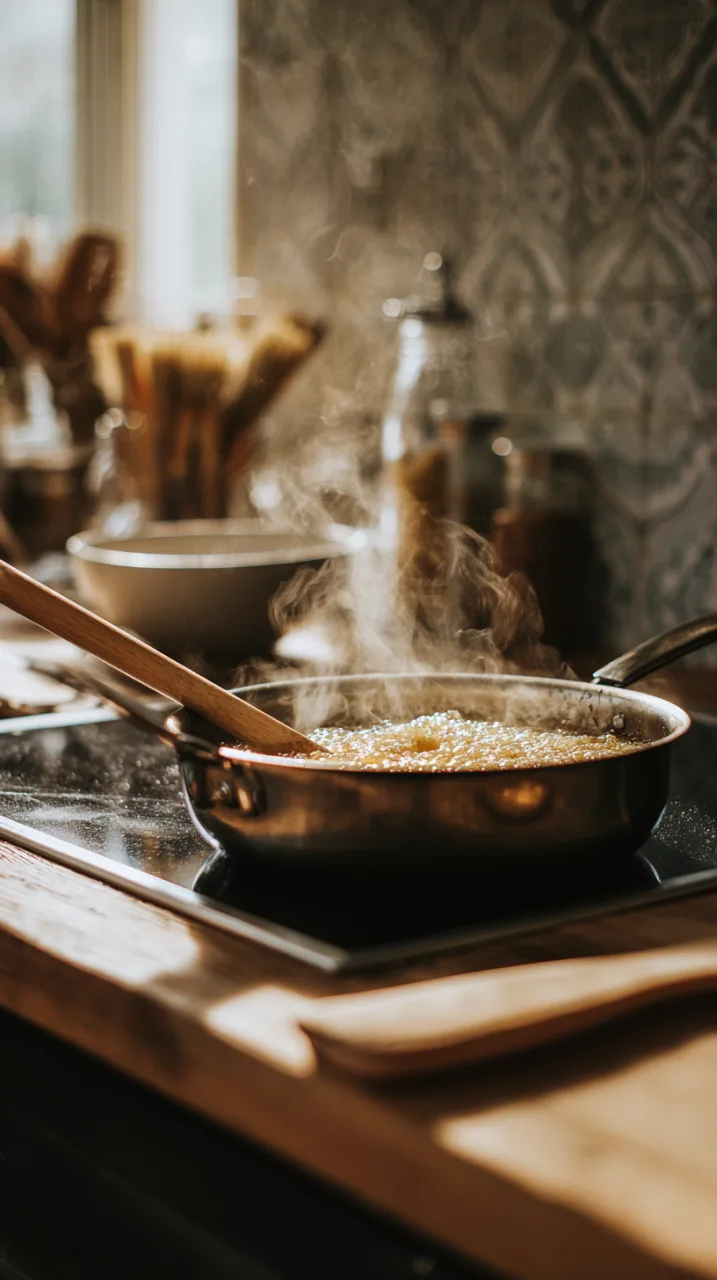
Caramel is sugar, fat, and dairy cooked together until molecules realign. It sounds technical, but here’s the picture: as the sugar climbs past 230°F and into the 240–245°F range (soft ball stage), it thickens enough to cling but stays pliable. Go higher and you’ll drift into hard candy territory. Lower and it’ll never firm up.
That’s why a candy thermometer isn’t optional. Stick it in so the bulb floats, not touching the pan bottom. Stir constantly with a wooden spoon or silicone spatula. And here’s a pro trick: keep a pastry brush in a small bowl of water. Every couple of minutes, brush down the inside walls of the saucepan to wash away any sugar crystals that creep up. Skip this step and the whole batch can seize into rock.
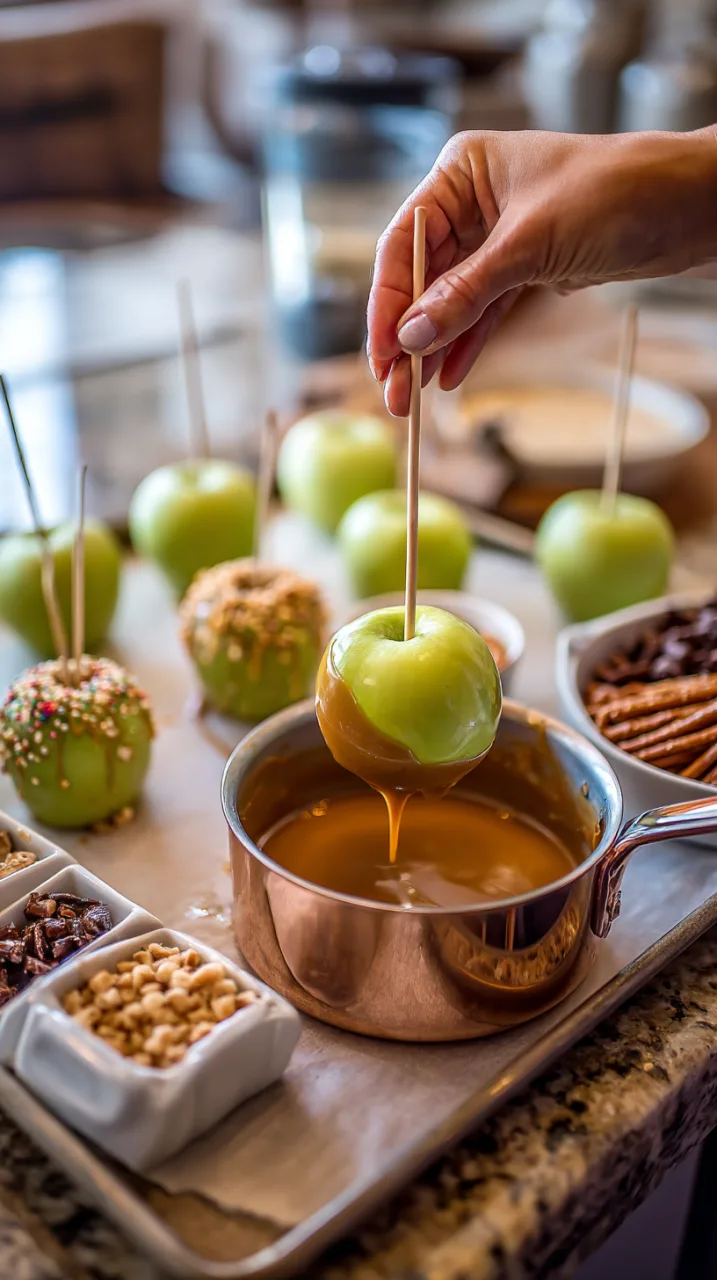
When it’s ready, pull the pan off the heat, stir in your vanilla and salt, then tilt the saucepan. Dip each apple in, swirling as you turn the stick. Let excess drip off. I always scrape the bottom edge lightly on the lip of the pan so it doesn’t create a caramel puddle.
If you’ve ever wondered why temperatures matter so much in recipes like this, check out our guide to how to measure baking ingredients for more kitchen precision tips.
The Spots Where Folks Trip
Caramel sliding off? Wax or water left on the apple. Scrub and dry until it squeaks.
Too hard to bite? You overshot the temp. Stay closer to 240°F.
Gritty? Crystals formed. That’s where the corn syrup and brush trick come in.
Cooking for One, for Kids, or for a Crowd
Half batch will cover four apples for family. Full batch makes eight, perfect for a party. In catering, I’ve done fifty. The trick is trays lined with silicone mats, dipping in rounds. Caramel won’t wait for you. If it stiffens, rewarm gently.
Once dipped and set, wrap each apple in wax paper or plastic. Into the fridge. They’ll last three days. Pull them out fifteen minutes before serving so the caramel softens back into chew.
For holiday gatherings, these old fashioned Thanksgiving dressing notes can help round out your table alongside caramel apples.
Thinking About Nutrition (Sort Of)
Yeah, it’s sugar. One apple runs about 300 calories. But you’re eating fruit under there, so call it balance. I like smaller apples, they feel right in the hand, portion’s more forgiving. Salty toppings help too. Crushed peanuts, pretzels. They cut the sugar, keep you wanting another bite instead of feeling knocked out.
When you want something lighter but still seasonal, try this roasted butternut squash quinoa salad for a healthier balance at fall meals.
What If You Don’t Have Everything?
Honey can stand in for corn syrup. Behaves different but still helps with crystals.
Dairy-free? Coconut cream instead of condensed milk. Butter swap for a vegan margarine. Flavor swings tropical but still clings.
And if you’re just not up for candy thermometers and hot sugar, melt a bag of caramels with a splash of cream in the microwave. It won’t taste as layered, but it’ll coat and set. Sometimes that’s enough.
If you need to substitute dairy or fats in baking, this article on how to measure butter and fats is a practical reference to keep handy.
California Touch
Come September, the orchards around Watsonville and Pajaro Valley fill with families picking fruit. That’s when I buy crates. Apples straight from the tree carry a snap you won’t find on supermarket shelves.
For toppings, I reach local too. Almonds toasted from Chico. Walnuts out of Sonoma. Chocolate drizzle with Guittard, since they’re Bay Area through and through.
Serving adults? Late harvest Riesling or a local dry cider. Both cut caramel like a knife.
For a dinner party, I’ll quarter the apples once set, plate them in a circle, dust with cinnamon sugar. Guests pick up a slice, no wrestling the whole apple.
For another cozy apple recipe, this shaved fennel and apple salad pairs crisp fruit with bright flavors that work year-round.
How To Make Caramel Cady Apples
Print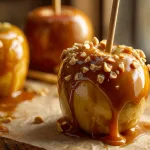
How To Make Caramel Candy Apples
- Prep Time: 25 minutes
- Cooling Time: 30 minutes
- Cook Time: 20 minutes
- Total Time: 1 hour 15 minutes
- Yield: 8 apples 1x
- Category: Dessert, Snack
- Method: Stovetop
- Cuisine: American
Description
These caramel candy apples are crisp, tart, and perfectly coated in homemade caramel. You’ll learn how to prep the apples, make smooth caramel from scratch or with a shortcut, and add toppings before letting them set. The result is a fall favorite that’s glossy, chewy, and festive.
Ingredients
Home Made Ingredients
- 8 crisp tart apples such as Granny Smith or Honeycrisp
- 8 wooden sticks or lollipop sticks
- 1 cup (2 sticks) unsalted butter
- 2 cups packed light brown sugar
- 1 cup light corn syrup
- 1 can (14 oz) sweetened condensed milk
- 1 teaspoon pure vanilla extract
- 1/2 teaspoon kosher salt
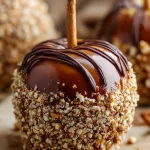
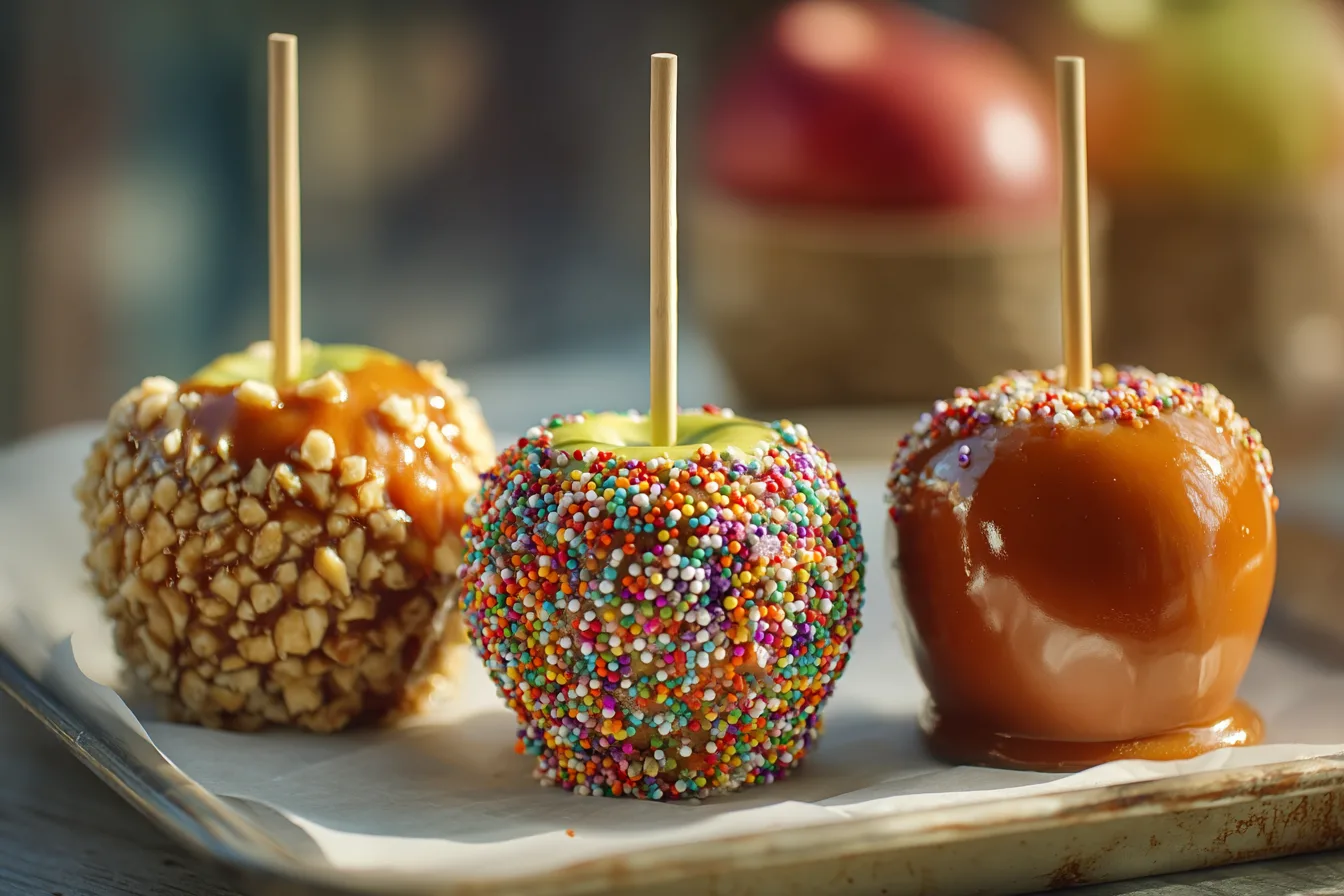
- Toppings of choice: chopped nuts, mini chocolate chips, sprinkles, crushed cookies, coconut
Shortcut option:
- 1 bag (14 oz) individually wrapped soft caramel candies
- 2 tablespoons heavy cream or milk
Equipment:
- Heavy-bottomed medium saucepan
- Candy thermometer
- Wooden spoon or silicone spatula
- Baking sheet lined with parchment paper or silicone mat
- Small bowls for toppings
- Pastry brush and small bowl of water (for cleaning sugar crystals off pan sides)
Instructions
- Wash the apples thoroughly. Dip quickly in very hot water mixed with a splash of vinegar to remove wax. Dry them completely with a towel. Insert a wooden stick firmly into the stem end of each apple. Set aside.
- Line a baking sheet with parchment paper or a silicone mat. Lightly grease with cooking spray. Arrange apples on the sheet. Place any toppings you want to use into small bowls and keep close to your workstation.
- For homemade caramel: In a heavy saucepan, melt the butter over medium heat. Stir in the brown sugar, corn syrup, and sweetened condensed milk. Attach a candy thermometer to the pan. Stir constantly until the mixture reaches 240°F (soft-ball stage). Remove from the heat and stir in the vanilla and salt.
- For shortcut caramel: Place unwrapped caramel candies and cream in a microwave-safe bowl. Heat in 30-second bursts, stirring between each, until melted and smooth.
- Working quickly, tilt the saucepan slightly and dip each apple, swirling to coat evenly. Let excess caramel drip back into the pan. For a smooth finish, gently scrape the bottom of the apple against the edge of the pan before setting it down.
- While the caramel is still warm and sticky, roll or sprinkle the apples in toppings. Press gently so they adhere.
- Place coated apples on the prepared baking sheet and let them set at room temperature until firm, about 30 minutes. If your kitchen is warm, refrigerate briefly to help the caramel harden.
Notes
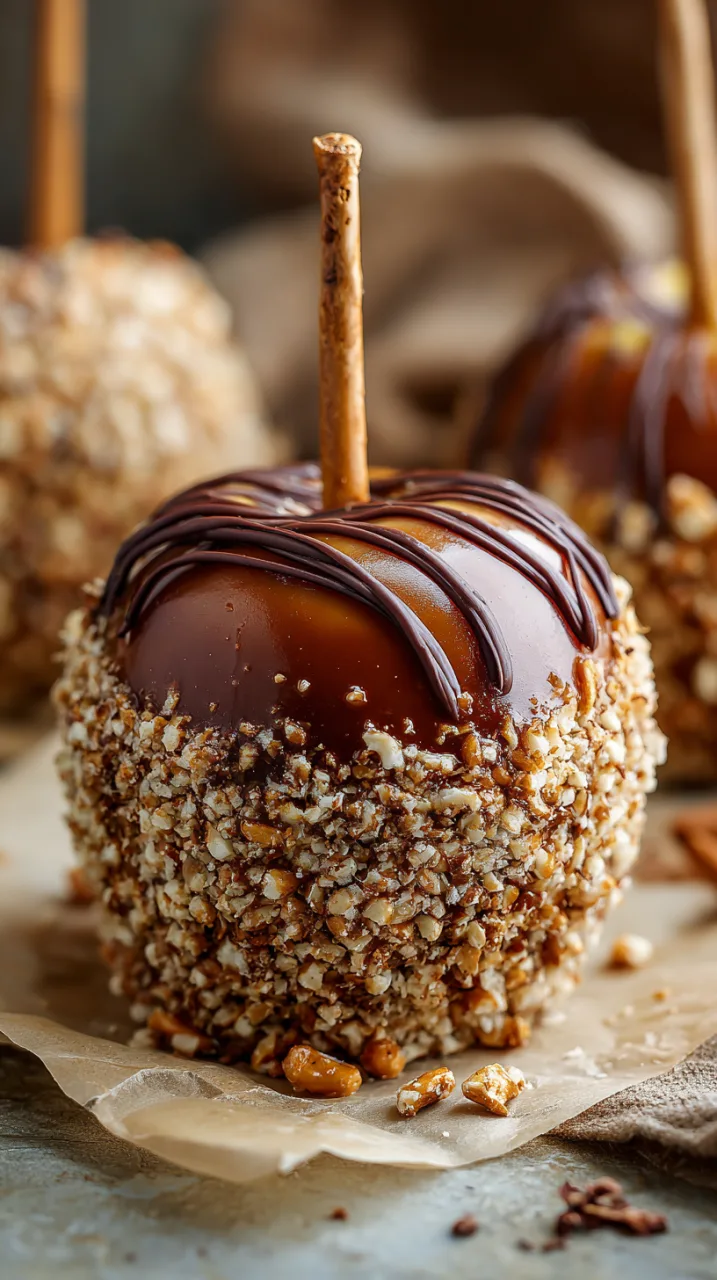
These caramel candy apples stand out with one small original element: a quick dip of the finished caramel-coated apples into finely ground salted pretzels before adding sweet toppings. The pretzel layer adds crunch and a salty balance that cuts through the caramel’s sweetness. This twist makes them unique without losing the classic flavor. Store apples wrapped individually in wax paper or plastic wrap. Keep refrigerated for up to 3 days.
Nutrition
- Serving Size: 1 Apple
- Calories: 320 kcal (approx. per apple, varies with toppings)
Quick Fire Questions
Do I need tart apples? No, but they balance the sugar best.
Can I just use caramel sauce from a jar? Tastes good, won’t set right.
Why grainy? Crystals. Corn syrup + brush stops that.
How long do they last? Three days wrapped and chilled.
Can kids help? Sure, dipping and toppings. Keep them away from the hot sugar stage.
Do I really need a thermometer? Yes. Guessing is gambling.
What toppings stick best? Nuts, pretzels, sprinkles, chocolate drizzle, crushed cookies.
My Little Twist
Here’s what sets mine apart. After the dip, I roll the apple lightly in finely crushed salted pretzels before anything else. Creates a base. Salty crunch right under the caramel. Then I’ll layer nuts or sprinkles or drizzle chocolate on top. That pretzel layer keeps the bite from tipping into too-sweet territory. Started as a bar snack hack, stuck with it ever since.
For sweet holiday gifting ideas beyond caramel apples, try making a batch of Christmas bark – it’s festive, simple, and just as craveable.
The Final Bite
Caramel apples aren’t hard, but they ask you to pay attention. Sugar is quick to punish if you wander off. But when you’ve got them lined up on parchment, glossy and golden, and that first bite pulls against your teeth with just enough fight, you’ll get why it’s worth it.
So grab some apples, scrub them clean, heat the sugar. It’s messy, sticky, and you’ll probably lick your fingers more than once. But you’ll remember it, just like a fairground fall.
If you want more recipes told with the same kind of straight talk and chef’s touch, I share them in the Simply Delicious Newsletter, quick reads, real kitchen tips, and seasonal ideas straight from my line to your table.