You’ll Never Buy Chili Crisp Again After Making This
We all do it. We fall in love with a crunchy, spicy chili crisp from the store – spoon it over everything – then blink and it’s gone. But the jar costs nine bucks. Sometimes more. And honestly? Some of them taste burnt. Or worse, like bland oil.
Here’s the thing that nobody tells you: the homemade stuff? It hits different. Better crunch. More flavor. Way more fun. And it’s cheaper.
The trick is knowing how to get the oil hot enough, when to add what, and how not to poison anyone with soggy garlic bits. I’ll walk you through it like we’re standing in your kitchen. No weird ingredients unless you want them. Just crispy, spicy magic in a jar.
What Is Chili Crisp Anyway?

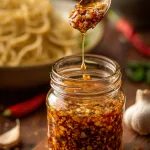
Chili crisp is part chili oil, part crunchy topping, part umami bomb. It’s packed with fried garlic, shallots, chili flakes, and oil, and sometimes extras like peanuts, fermented soybeans, or mushroom powder. It’s the stuff you spoon over eggs, noodles, rice, roasted veggies—basically everything.
The oil carries the heat and fragrance. The bits add crunch. The seasoning makes it unforgettable.
Looking for more bold, savory flavors? Try this fiery Korean BBQ Beef recipe – it’s perfect with a spoonful of chili crisp on top.
Key Ingredients You Actually Need

You only need a few things to make a killer batch. Most are pantry basics:
Neutral oil is your foundation. Go with peanut, canola, or soybean oil. Olive oil is too strong and smokes too soon.
Chili flakes give it heat. Chinese chili flakes or Gochugaru work best. You want color and aroma, not just fire.
Garlic and shallots add crunch and fragrance. Slice thin and fry ‘til golden.
Salt and sugar balance the burn. Trust me—don’t skip.
Then there’s the optional stuff: Sichuan peppercorns, mushroom powder, soy sauce, MSG, cinnamon, star anise, sesame seeds, dried citrus peel, peanuts, fermented soybeans. Go wild or keep it classic.
Chili crisp loves a good partner—this Sweet Soy Glaze adds another layer of umami and works beautifully drizzled over noodles or rice bowls.
Tools That Make Life Easier
You’ll want a thermometer. You don’t have to have one, but if your oil hits 400°F, it burns the garlic and your kitchen smells like regret. Aim for 350–375°F. A fine-mesh strainer helps too.
Use a saucepan with higher sides to keep the splatter down.
Metal or ceramic bowl for mixing—plastic melts. Learned that the dumb way.
Need to upgrade your kitchen gear? Here’s our chef-tested list of the Best Professional Chef Knives on Amazon – including affordable picks that work just as well at home.
Step One: Fry the Aromatics Without Burning Them

Start with the oil and cold aromatics. Set a pan over medium heat. Add 1½ cups of oil, ½ cup sliced shallots, and 8 garlic cloves sliced thin.
Stir here and there. The goal is golden and crispy, not deep brown. If you see dark specks, yank the pan. Burned garlic ruins the whole thing.
It should take 20–25 minutes. When they’re toasty and light brown, scoop them out and let them drain on a paper towel.
If you’re new to sautéing or shallow frying, this simple breakdown of the Sauté Cooking Method will help you get that perfect golden crunch without the guesswork.
Step Two: Prep the Chili Mix
While the oil cools a bit, grab your heatproof bowl.
Toss in ½ to ¾ cup chili flakes (adjust heat to taste), 1 tablespoon sugar, 1 to 2 teaspoons salt, 1 tablespoon soy sauce (optional), and any extras like mushroom powder, MSG, or sesame seeds.
Add a handful of crushed roasted peanuts or soybeans if you’re feeling crunchy.
Sichuan pepper? Use 1 teaspoon, ground or whole.
Want it more fragrant? Add a pinch of cinnamon or a clove or two of star anise now. This is your flavor bomb waiting to be lit.
If chili oils are your thing, don’t miss our spicy and smoky Mexican Chili Oil Recipe (Salsa Macha) — it’s a different heat, but equally addictive.
Step Three: Pour Hot Oil Over the Chili Mix

Once your oil hits 350°F again (or close), pour it slowly over the chili mixture. It’ll sizzle and bloom in the most satisfying way.
Stir it gently.
Now fold the crispy shallots and garlic back in. You just made chili crisp. It should look glossy, speckled with golden bits, and smell like heaven if heaven served noodles.
Step Four: Let It Cool and Get Better Overnight
Let the whole thing cool to room temp. Taste it—but honestly, it gets better the next day.
Store it in a clean jar. It’ll keep in the fridge for a month easy—sometimes more if your crispy bits are truly dry.
Oil on top, crunch on the bottom. Stir before using.
Ways to Use It (That Aren’t Just Noodles)

Spoon it over scrambled eggs. Drizzle it on pizza. Dunk dumplings in it. Slather it on a toasted bagel with cream cheese. Stir it into mayo. Mix with honey for chili crisp drizzle. Or eat it with a spoon—no judgment here.
We’ve even tossed it into popcorn. Changed our lives.
Storage and Safety Tips
Here’s the thing nobody wants to talk about: soggy garlic and shallots can cause botulism if they aren’t fully dry.
Solution? Fry them ‘til they’re really crisp and store your chili crisp in the fridge. Keeps it fresh and safe. Some folks strain out the bits and only add them as needed, but we like the crunch mixed in.
Clean jars. Cold fridge. No double dipping.
Want to Customize It?
Try citrus zest, ground ginger, or Japanese shichimi togarashi. Add maple syrup. Drop in some fried scallions. Even pistachios. Just keep that oil hot and your garlic dry.
This is one of those condiments where once you get the feel, you’ll riff like a jazz player.
Pro Tips From the Kitchen
Don’t rush the fry. Garlic takes its sweet time. If it goes from pale to black in 60 seconds, the oil’s too hot.
Use a metal spider or slotted spoon to scoop the bits. Paper towels suck oil and make them soft.
Taste as you go. Chili crisp is personal. You like more tang? Add vinegar. More depth? Add soy sauce or miso.
Keep the oil clean. Burned bits mean bitter chili crisp.
FAQs About How to Make Chili Crisp
Can I use olive oil instead of peanut oil?
You can, but it smokes at lower temps. It’ll taste grassy. Stick with neutral oils like canola or peanut.
Is it vegan?
Yes, unless you add fish sauce or something wild. Most versions are totally plant-based.
What chili flakes should I use?
Chinese-style chili flakes, Gochugaru, or crushed red pepper flakes. Just don’t use smoked ones like chipotle unless you want a different vibe.
How long does it last?
At least a month in the fridge if stored right. Some folks say three, but we eat it way faster than that.
Can I skip the garlic?
You could, but it won’t be chili crisp. It’ll be chili oil. Different beast.
Why did my garlic turn green?
That’s sulfur and acid reacting. Still safe, just kinda weird-looking.
Can I freeze it?
You could, but the texture might suffer. Keep it in the fridge instead.
The Final Bite
You made something bold, crunchy, and way better than store-bought.
Homemade chili crisp is a secret weapon, that can go good on eeevvveerryyytthhing!
If this kind of kitchen win makes you hungry for more, sign up for the Simply Delicious Newsletter. It’s where I share real recipes, quick tips, and the occasional story from behind the line.
I’m Ryan Yates, working executive chef with 20 years behind the stove. Thanks for cooking with me.
About the Author
Ryan Yates is a culinary expert with over 20 years of experience in commercial kitchens. As a working executive chef, he has a passion for creating delicious, accessible recipes that bring joy to home cooks everywhere. Ryan believes in the magic of simple ingredients and loves sharing his knowledge to help others find happiness in cooking.