This Red Velvet Pancakes Recipe Will Make You Swoon
Ever wished for a breakfast that’s as delicious as it looks?
You crave something special, but regular pancakes feel boring.
Maybe you’re planning a brunch, and you want to wow your friends, or perhaps a special valentines day breakfast.
Well, this red velvet pancakes recipe is your answer!
These beauties are not just pancakes; they’re a treat for the eyes and taste buds, with that famous red color and yummy flavor. Let’s get into making these yummy treats!
What You’ll Need: Ingredients for Perfect Pancakes and Topping

Alright, let’s talk about what goes into our red velvet pancakes. Each ingredient plays a role in making these pancakes stand out.
First up is all-purpose flour, the basic for our pancake batter.
Sugar is next, adding the sweet taste everyone loves in pancakes.
Baking powder and a little baking soda help the pancakes rise nicely.
A pinch of salt balances the sweetness.
Cocoa powder is very important, offering just a hint of chocolate flavor that’s a must for red velvet.
Now for the wet stuff.
We use eggs to bind the batter together.
Buttermilk gives the pancakes a soft texture and a slightly tangy taste that’s super yummy.
Melted butter makes them rich.
Red food coloring brings that bright, can’t-miss-it red color.
A dash of white vinegar works with the other ingredients to boost the flavor and texture.
For the cream cheese glaze, we’ve got cream cheese for that classic tangy flavor.
Powdered sugar sweetens it up.
A bit of milk helps get the right, smooth texture, and vanilla extract adds a nice flavor.
But wait, there’s a twist!
A white chocolate buttermilk syrup.
It might sound fancy, but it’s easy.
You need buttermilk, sugar, white chocolate chips, and a dab of butter.
A touch of baking soda makes it a bit foamy, and vanilla extract adds extra flavor.
Step-by-Step to Red Velvet Pancake Perfection
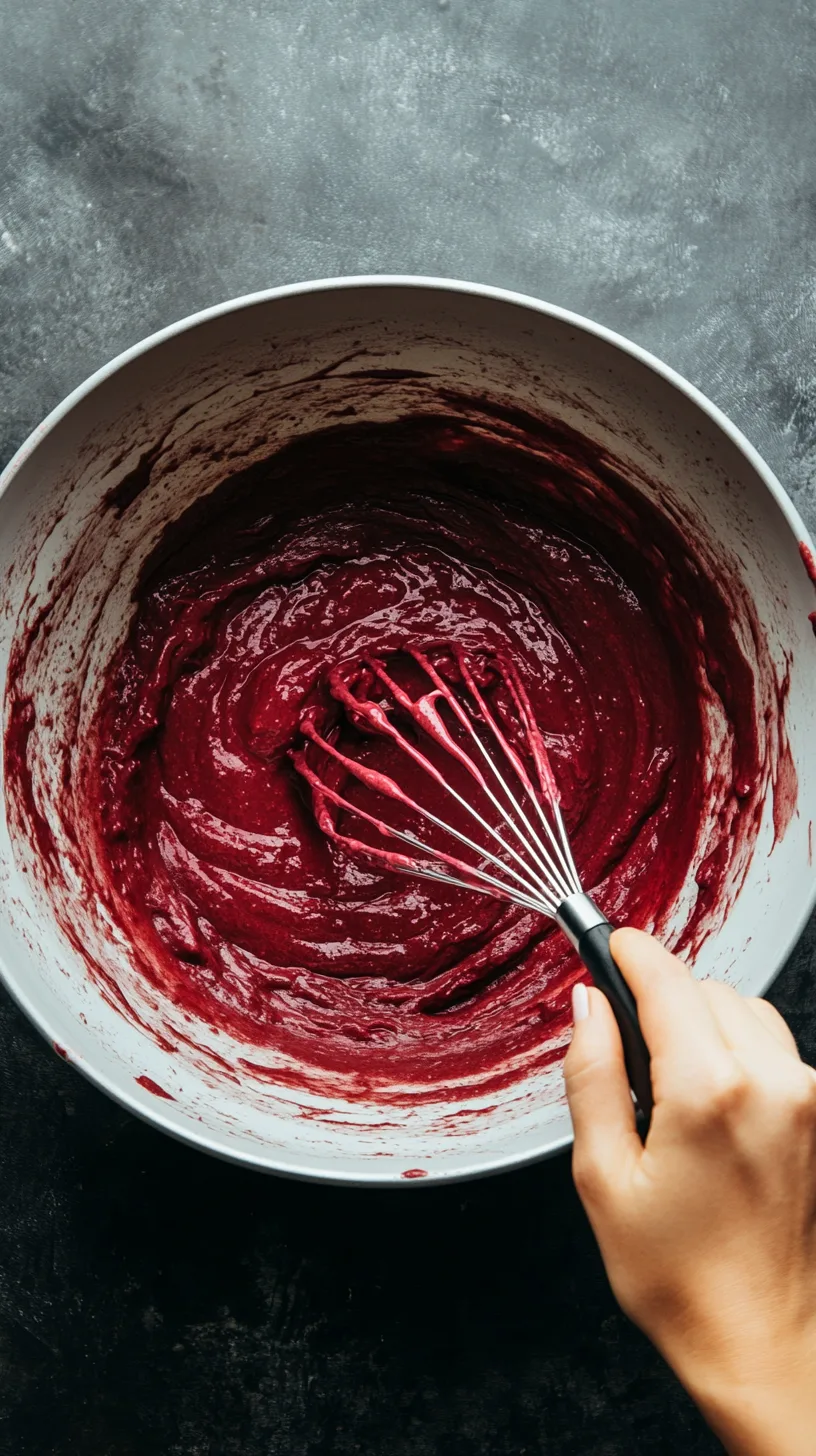
We’re making red velvet pancake batter now, a simple and fun process.
Start with a large bowl.
In it, we whisk together our dry ingredients: the flour, sugar, baking powder, baking soda, salt, and that bit of cocoa powder. Make sure these are mixed really well.
Next, grab another bowl for the wet ingredients.
Beat a couple of eggs lightly, then pour in buttermilk, melted butter, and vanilla extract. Now, for that iconic color, add your red food coloring. A splash of white vinegar goes in, too. This little secret makes our pancakes extra fluffy and tasty. Stir all these wet ingredients together until they’re nicely combined.
Time to combine forces!
Gently add your wet mixture to the dry ingredients. Stir them together, but be careful. Don’t mix too much, or else your pancakes won’t be as fluffy.
A few lumps in the batter are okay.
Once everything is just mixed, let the batter sit for a few minutes. It helps the ingredients get to know each other.
Cooking Your Red Velvet Pancakes
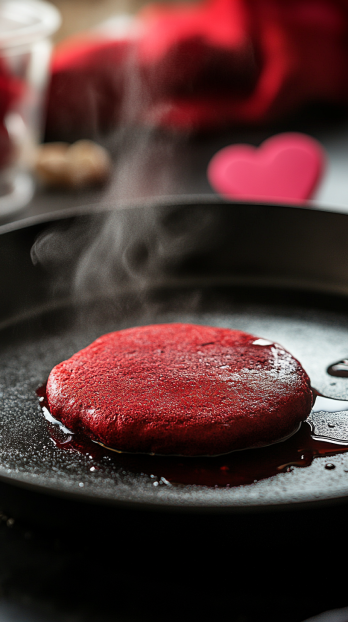
It’s time to cook these red velvet pancakes. Put your griddle or a big non-stick skillet on medium heat. You want it hot, but not too hot. A little bit of butter or a quick spray of cooking oil will keep the pancakes from sticking.
Now, scoop about a quarter cup of our red batter onto the hot surface for each pancake. They’ll start to cook, and you’ll see little bubbles.
That’s when you know it’s time to flip them over.
Cook each side for a couple of minutes. They should be a lovely golden brown. Take them off the heat when they’re done.
Keep your cooked pancakes warm while you finish the rest. A warm oven works great for this. Soon, you’ll have a beautiful stack of red velvet pancakes, all ready to eat.
Red Velvet Pancakes Recipe
Print
Red Velvet Pancakes Recipe
- Prep Time: 20 minutes
- Cook Time: 20 minutes
- Total Time: 40 minutes
- Yield: 12 pancakes 1x
- Category: Breakfast, Brunch
- Method: Stovetop
- Cuisine: American
Description
Imagine the rich, luxurious taste of red velvet cake transformed into fluffy, melt-in-your-mouth pancakes. That’s exactly what you get with these Red Velvet Dream Cakes. Perfect for a special occasion or simply when you want to treat yourself, these pancakes are sure to impress. They boast a beautiful, vibrant red hue, a subtle cocoa flavor, and a hint of tanginess, all complemented by a smooth cream cheese glaze and a unique white chocolate buttermilk syrup. Get ready for a breakfast that’s both visually stunning and incredibly delicious!
Equipment:
Ingredients
For the Pancakes:
- 2 cups all-purpose flour
- 1/4 cup granulated sugar
- 4 teaspoons baking powder
- 1 teaspoon baking soda
- 1 teaspoon salt
- 2 tablespoons unsweetened cocoa powder
- 2 large eggs
- 2 cups buttermilk
- 1/2 cup unsalted butter, melted and cooled
- 2 teaspoons vanilla extract
- 2–3 tablespoons red gel food coloring (for that signature vibrant color)
- 1 teaspoon white vinegar (secret ingredient for extra fluffiness and tang)
For the Cream Cheese Glaze:
- 4 ounces cream cheese, softened
- 1/2 cup powdered sugar
- 1/4 cup milk
- 1 teaspoon vanilla extract
For the White Chocolate Buttermilk Syrup:
- 1 cup buttermilk
- 1/2 cup granulated sugar
- 1/4 cup white chocolate chips
- 1 tablespoon unsalted butter
- 1/2 teaspoon baking soda
- 1/2 teaspoon vanilla extract
Instructions
Get Started with the Pancakes:
- In a large bowl, whisk together the flour, sugar, baking powder, baking soda, salt, and cocoa powder. This dry mix forms the base of your pancakes.
- In a separate bowl, beat the eggs lightly. Add in the buttermilk, melted butter, vanilla extract, red gel food coloring, and white vinegar. Stir everything together until well combined.
- Gradually add the wet ingredients to the dry ingredients, mixing gently until just combined. Be careful not to overmix; a few lumps are perfectly fine. Overmixing can lead to tough pancakes. Let the batter sit for five minutes.
Cook the Pancakes:
- Heat your griddle or skillet over medium heat. Lightly grease it with butter or cooking spray.
- Pour 1/4 cup of batter onto the hot griddle for each pancake.
- Cook for 2-3 minutes per side, or until golden brown and cooked through. You’ll know they’re ready to flip when bubbles start to form on the surface and the edges look set.
- Remove the cooked pancakes from the griddle and keep them warm while you cook the rest.
Make the Cream Cheese Glaze:
- While the pancakes are cooking, prepare the glaze. In a bowl, beat the softened cream cheese until smooth.
- Gradually add the powdered sugar and milk, beating until smooth and creamy.
- Stir in the vanilla extract. If the glaze is too thick, add a little more milk, one teaspoon at a time, until you reach your desired consistency.
Whip Up the White Chocolate Buttermilk Syrup:
- In a small saucepan, combine the buttermilk and sugar. Cook over medium heat, stirring constantly, until the sugar is dissolved.
- Stir in the white chocolate chips and butter. Continue to cook, stirring frequently, until the chocolate is melted and the mixture is smooth.
- Remove from heat and stir in the baking soda and vanilla extract. The mixture will foam up slightly. Let it cool slightly, and it will thicken as it cools.
Serve and Enjoy:
- Stack the warm pancakes on a plate.
- Drizzle generously with the cream cheese glaze and the white chocolate buttermilk syrup.
- Add any of your favorite toppings. Some berries would do well, or even some more white chocolate chips.
Notes
- The Unique Twist: The white chocolate buttermilk syrup is what sets this recipe apart. It adds a unique layer of flavor that complements the red velvet and cream cheese glaze beautifully, providing a delightful contrast in both taste and texture. While some recipes from the consensus offered a buttermilk syrup, none incorporated white chocolate, making this a special touch. It elevates the dish from great to exceptional, creating a more memorable and indulgent experience.
- For an extra vibrant red color, you can add a touch more food coloring.
- If you don’t have buttermilk, you can make a substitute by adding 1 tablespoon of lemon juice or vinegar to 2 cups of regular milk. Let it sit for 5-10 minutes before using.
- These pancakes are best served immediately, but leftovers can be stored in the refrigerator for up to 3 days. Reheat in the microwave or a toaster oven.
Nutrition
- Serving Size: 1 Pancake
- Calories: 250
- Sugar: 12g
- Sodium: 300mg
- Fat: 10g
- Saturated Fat: 6g
- Carbohydrates: 35g
- Fiber: 1g
- Protein: 6g
- Cholesterol: 45mg
The Secret to the Perfect Cream Cheese Glaze
Our cream cheese glaze is really easy to make. You just need to beat softened cream cheese until it’s nice and smooth. Then, slowly add powdered sugar and milk. You’re looking for a creamy texture, not too thick, not too runny. A splash of vanilla extract finishes it off with a lovely flavor.
Taking it up a Notch With Our Simple White Chocolate Buttermilk Syrup Recipe

This white chocolate buttermilk syrup is something special.
Heat buttermilk and sugar in a small pot, stirring until the sugar dissolves.
Toss in white chocolate chips and butter.
Keep stirring until the chocolate melts, making the syrup smooth.
Take it off the heat, stir in some baking soda and vanilla.
Watch it get a little foamy and thicken up as it cools.
This syrup is a game-changer. It’s sweet, a bit tangy, and totally delicious with our pancakes.
How To Plate And Serve Your Red Velvet Pancakes
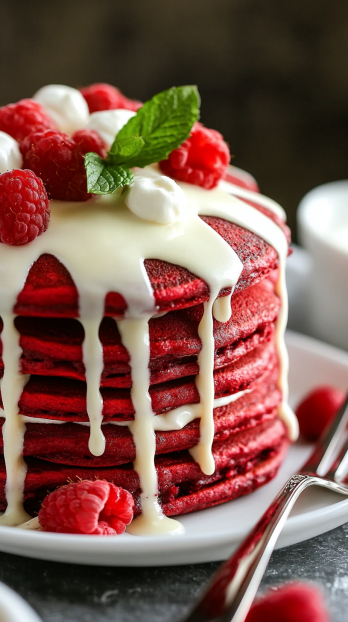
Now comes the fun part: serving up these red velvet beauties.
Stack a few pancakes on a plate. They’re so pretty, they almost look too good to eat.
Drizzle that creamy cream cheese glaze generously over the stack. It’s okay to let it drip down the sides. Then, add a good pour of our special white chocolate buttermilk syrup.
Want to make it even better?
Add some fresh berries on top.
They add a nice pop of color and a fresh taste that goes great with the rich pancakes.
A few extra white chocolate chips on top never hurt anyone, either.
What you get is a breakfast that’s totally delicious.
Expert Tips – Getting the Most Out of Your Red Velvet Pancakes
We want your red velvet pancakes to be the best ever, so here are some tips.
Don’t skip the vinegar. It reacts with the baking soda to make your pancakes extra fluffy.
The gel food coloring is better than liquid for a really vibrant red.
For even cooking, don’t rush the heat on your griddle or pan.
Medium heat is perfect.
Also, let the batter rest a bit after mixing. It makes a difference.
Creative And Fun Variations on the Classic Recipe
Red velvet pancakes are great, but why not mix things up a little?
You could add chocolate chips to the batter.
Chocolate and red velvet are a match made in heaven.
For a fruity twist, mix in some blueberries or raspberries.
If you’re feeling adventurous, a swirl of cream cheese filling in the batter makes for a delightful surprise.
Also try different toppings.
Whipped cream, a dusting of powdered sugar, or even a sprinkle of cocoa powder can add that extra something.
How to Keep Your Pancakes Fresh and Tasty
Got leftover pancakes?
No problem!
Let them cool down first.
Then, you can keep them in the fridge.
Put them in an airtight container, or wrap them tightly in plastic wrap.
They’ll stay good for about three days.
When you’re ready to eat them, just pop them in the microwave or toaster oven for a quick reheat.
They might not be as fluffy as when they were fresh, but they’ll still be tasty.
Nutritional Insights: What’s in a Red Velvet Pancake
These pancakes are a treat, so they have sugar and carbs. Each one is about 250 calories. They contain a bit of fat, some protein, and essential nutrients. The glaze and syrup add extra sweetness and calories, so remember, enjoy these pancakes in moderation.
Ingredient Alternatives – No Buttermilk, No Problem
Can’t find buttermilk? Mix regular milk with a little lemon juice or vinegar.
Let it sit for a few minutes, and there you go.
Out of red gel food coloring? Beet juice can add some color, though it won’t be as bright.
For the glaze, if you don’t have cream cheese, try using mascarpone or even Greek yogurt for a different but still yummy topping.
And if white chocolate chips aren’t available, regular chocolate chips work in the syrup.
Frequently Asked Questions
Yes, make the batter and cook them. Then, just reheat when you’re ready to eat.
Gel food coloring gives the best color, but liquid works, too.
Use a good gluten-free flour blend in place of regular flour.
Try mascarpone cheese or a thick Greek yogurt for a different flavor.
Regular chocolate chips will work in the syrup.
Sure, just let them cool, then wrap them well and freeze.
Make sure your food coloring is fresh and add a bit more to get that deep red.
The Final Bite
And there you have it, friends – you’re now ready to whip up your very own batch of red velvet dream cakes!
We’ve walked through each step together, from mixing that vibrant batter to drizzling on that irresistible glaze and unique syrup.
Remember, cooking should be fun, so don’t be afraid to get a little messy and make these pancakes your own.
Whether you’re making them for a special someone or just treating yourself, these red velvet pancakes are sure to bring a smile to your face.
Enjoy the process, savor every bite, and most importantly, have a blast creating something delicious.
Happy pancake flipping, and here’s to a breakfast that’s as wonderful as you are! You got this.
Disclosure: Every recipe here is developed and tested by Ryan Yates, a Le Cordon Bleu-trained chef with more than 20 years in professional kitchens. Editorial tools help with formatting and structure. This post may contain affiliate links — if you buy through one we may earn a small commission, at no extra cost to you.