
The Secret to Fluffy Quick Dinner Rolls Everyone Forgets
Dinner’s almost done. Roast is in. Veggies are prepped.
And then it hits you: no bread.
You glance at the clock. Too late to run out. And frozen rolls? You know better. They always taste like disappointment.
We’ve all been there—scrambling for something warm and buttery to round out the meal. This recipe is your safety net.
Quick dinner rolls that feel homemade… because they are. You get soft, golden bread in under an hour. And the best part? A brown butter glaze that makes people think you’ve been planning this all day.
You haven’t. But that’s between us.
Want something cozy and nostalgic to serve with these rolls? Our Old-Fashioned Thanksgiving Dressing never misses.
Ingredients That Actually Do the Work

Every ingredient in this recipe matters. Nothing extra. Nothing wasted.
- ¾ cup warm milk: Makes the crumb soft and a little sweet.
- ½ cup warm water: Keeps the dough hydrated without adding richness.
- 2 tbsp sugar: Feeds the yeast and helps the rolls brown.
- 2¼ tsp active dry yeast (1 packet): Gets your dough rising fast.
- 2 tbsp unsalted butter (melted): Adds flavor and softness.
- 1 tsp salt: Rounds it all out. Bread without salt is flat.
- 1 egg: Gives structure and a touch of richness.
- 3½ cups all-purpose flour (plus more if needed): The backbone of the dough.
- 4 tbsp unsalted butter (for the glaze): We brown it. That’s the magic.
- Flaky sea salt (optional): Adds crunch and sparkle on top.
Need a protein-packed main to match? This Bistro-Style Pan-Seared Steak pairs beautifully.
How to Make Rolls in One Hour (Yes, Really)

Step 1: Wake Up the Yeast
Combine warm milk, warm water, sugar, and yeast in a bowl. Stir it. Let it sit 5–10 minutes. It should get foamy. If it doesn’t, your yeast is no good.
Step 2: Mix the Dough
Add melted butter, salt, and egg. Stir it up. Start adding flour one cup at a time. Mix until it forms a soft dough that pulls away from the bowl and feels just a bit tacky.
Step 3: Knead
Stand mixer or hands—your call. Knead 5–7 minutes until the dough is smooth and elastic. Sticky? Add more flour, one tablespoon at a time.
Step 4: Quick Rise
Cover the bowl and let the dough rest in a warm spot for 20–30 minutes. It should puff a bit—it doesn’t need to double.
Step 5: Shape It
Divide into 12 pieces. Roll each into a tight ball. Place them in a greased 9×13 dish. Cover and let them rise again for 15–20 minutes.
Step 6: Bake
Into a 400°F oven they go. Bake 16–18 minutes. You want golden tops, soft centers.
Step 7: Brown Butter Glory
While they bake, melt butter in a saucepan. Keep it on medium. Let it brown—about 4–5 minutes. It’ll smell nutty and deep. As soon as the rolls come out, brush them generously. Sprinkle flaky sea salt if you’re feeling fancy.
Why Brown Butter Is Worth the Trouble
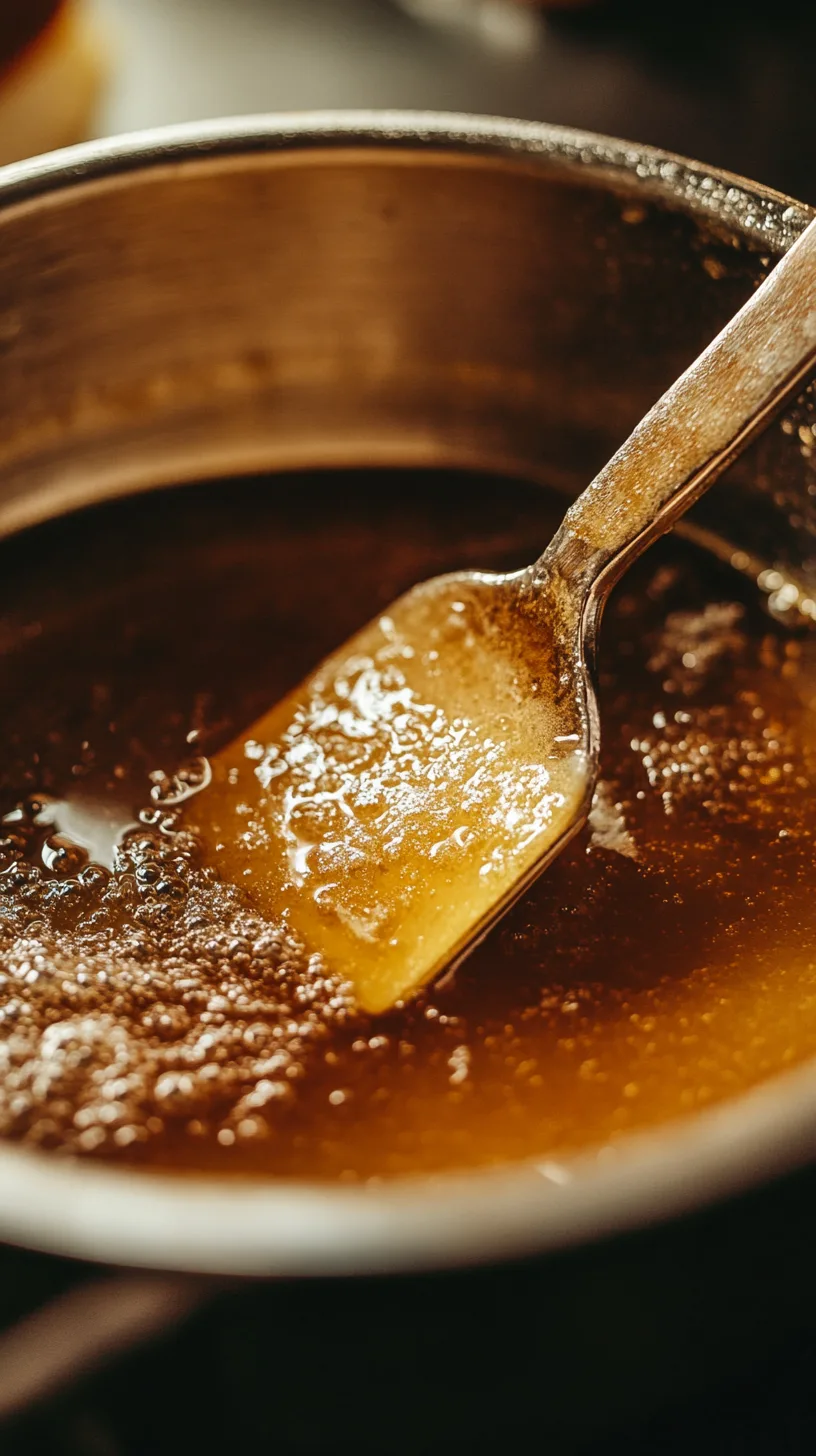
You could just melt some butter and brush it on. But that’s not the move here.
Brown butter is warm, rich, nutty—and it smells like you’ve been baking all day. It turns these fast rolls into something that tastes like you meant it.
People notice. They won’t know what it is, but they’ll ask. That’s how you know it’s working.
Ingredient Swaps That Still Work
- No milk? Use all water. Rolls will be slightly less rich but still soft.
- No egg? Skip it. Add 2 tablespoons extra milk. The texture shifts, but it works.
- Vegan? Use plant milk, vegan butter, and skip the egg. Adjust flour as needed.
- No yeast? Sadly, no. Yeast is non-negotiable here.
Baking egg-free? Our Waffles Without Eggs will fit perfectly on your next brunch table.
Nutrition Info (Per Roll)
- Calories: 190
- Carbs: 30g
- Protein: 4g
- Fat: 6g
- Sugar: 2g
- Fiber: 1g
- Sodium: 180mg
Tips That Actually Help
- Use warm—not hot—liquids. Think bathwater, not boiling.
- Keep the dough slightly sticky. That’s what makes the rolls soft.
- If your kitchen’s cold, warm your oven to 170°F, then turn it off and let the dough rise inside.
- Don’t walk away from the brown butter. It goes from golden to burnt fast.
Storage + Reheat Tips
Store leftovers in an airtight container at room temp for 2–3 days. Reheat for 10–15 seconds in the microwave, or wrap in foil and warm in a 300°F oven for 8–10 minutes.
Want to freeze them? Go for it. Bake, cool, freeze in a bag for up to a month. Thaw overnight in the fridge, reheat before serving.
Have leftover rolls? Our Ocean Spray Cranberry Sauce turns them into the ultimate day-after-Thanksgiving sandwich.
Serving Ideas That Always Hit

- Slather with honey butter in the morning.
- Serve with soup, stew, or chili.
- Make mini turkey or roast beef sandwiches.
- Brush with garlic butter and parmesan for a dinner party upgrade.
- Pair with a warm mug of our Holiday Eggnog for peak cozy.
Quick Roll Recipe Card
Print
Quick Dinner Rolls Recipe
- Prep Time: 20 minutes
- Resting Time: 30 minutes
- Cook Time: 18 minutes
- Total Time: 1 hour 8 minutes
- Yield: 12 rolls 1x
- Category: Bread, Side Dish
- Method: 12 rolls
- Cuisine: American
Description
These quick dinner rolls are fluffy, golden, and ready in just about an hour. What sets them apart is a rich brown butter glaze brushed on after baking, adding a deep, nutty finish that elevates the flavor beyond the usual soft roll. Perfect for weeknight dinners, holidays, or whenever you need a comforting bread on the table—fast.
Equipment:
-
Stand mixer (or large mixing bowl and wooden spoon)
-
Dough hook (if using stand mixer)
-
Measuring cups and spoons
-
Kitchen thermometer (optional, for liquid temperature)
-
9×13-inch baking dish
-
Saucepan (for browning butter)
-
Pastry brush
-
Clean kitchen towel or plastic wrap
Ingredients
For the Dough:
- 3/4 cup warm milk (110°F)
- 1/2 cup warm water (110°F)
- 2 tablespoons granulated sugar
- 2 1/4 teaspoons (1 packet) active dry yeast
- 2 tablespoons unsalted butter, melted
- 1 teaspoon salt
- 1 large egg
- 3 1/2 cups all-purpose flour (more if needed)
For the Brown Butter Glaze:
- 4 tablespoons unsalted butter
- Pinch of flaky sea salt (optional)
Instructions
-
Activate the Yeast
In the bowl of a stand mixer or a large mixing bowl, combine the warm milk, warm water, sugar, and yeast. Stir gently and let sit for 5 to 10 minutes until foamy on top. -
Make the Dough
Add the melted butter, salt, and egg to the yeast mixture and mix to combine. Add the flour one cup at a time, mixing with a dough hook or wooden spoon until the dough pulls away from the sides and forms a soft ball. It should be slightly tacky but not sticky. -
Knead the Dough
Knead on medium speed for 5–7 minutes (or by hand for about 10 minutes) until the dough is smooth and elastic. Add a bit more flour if the dough sticks heavily to your hands. -
First Rise
Cover the bowl with a clean towel or plastic wrap and let the dough rest in a warm place for 20–30 minutes, just until slightly puffy. -
Shape the Rolls
Turn the dough out onto a lightly floured surface. Divide it into 12 equal pieces and roll each into a ball. Place them in a greased 9×13-inch baking dish, spacing evenly. -
Second Rise
Cover and let the rolls rise again in a warm place for about 15–20 minutes, until noticeably puffy. -
Bake
Preheat your oven to 400°F. Bake the rolls for 16–18 minutes, or until golden brown on top. -
Make the Brown Butter Glaze
While the rolls bake, melt 4 tablespoons of butter in a small saucepan over medium heat. Let it cook, swirling occasionally, until the milk solids turn golden brown and it smells nutty—about 4–5 minutes. Remove from heat. -
Finish the Rolls
As soon as the rolls come out of the oven, brush the tops generously with the brown butter. Sprinkle with flaky sea salt if using. Serve warm.
Notes
The brown butter glaze is the standout element in this recipe. Most quick roll recipes use plain melted butter, but browning it adds a rich, toasty note that gives the rolls a more complex flavor—like you put in way more effort than you did. It’s an easy step that makes a big difference, especially when you’re serving them for guests or special dinners.
These rolls also freeze well. Let them cool completely, then store in an airtight container in the freezer for up to a month. To reheat, cover with foil and warm in a 300°F oven for 10–12 minutes.
Quick Dinner Rolls
Prep: 20 min | Rise: 30 min | Bake: 18 min | Total: 1 hour
Yield: 12 rolls
These are the rolls you make when you forgot the bread but still want to impress. They’re soft, buttery, and fast—but they don’t taste rushed. That’s the brown butter talking.
See full recipe card below.
Common Questions
Can I use instant yeast?
Yes—just mix it right into the dry ingredients. Skip the proofing step.
What if I only have bread flour?
Use it! Rolls will be chewier, but still delicious.
Can I make the dough ahead of time?
Yes. Shape the rolls, cover, and refrigerate overnight. Let them sit at room temp 30 minutes before baking.
Stand mixer required?
Not at all. Just a bowl, a spoon, and some elbow grease.
Why are my rolls dense?
Usually too much flour or not enough kneading. Keep it light and elastic.
What is brown butter exactly?
It’s just butter that’s been gently cooked until the milk solids toast. It tastes way fancier than it sounds.
Can I double it?
Yup. Just use two pans or one big sheet tray.
Final Bite
These rolls are fast. But more importantly, they’re good. Good enough to steal the show if your roast doesn’t turn out. Good enough to make again next week, just because.
If this recipe saves your dinner table once, it’ll probably do it again.
Want more no-nonsense, flavor-first recipes? Sign up for the Simply Delicious Newsletter. I’ll send you what works—no fluff, no fuss.
Written by Ryan Yates, working Executive Chef with two decades of behind-the-line experience. Every recipe is tested, tasted, and built to be cooked by real people.
Disclosure: This article uses automation for structure, but all insights and advice are provided by Ryan Yates, an experienced executive chef with over 20 years of expertise. Additionally, this post may contain affiliate links, which means we may earn a small commission if you purchase through them, at no extra cost to you. This helps support our work and allows us to keep providing high-quality content.